Setting up a Google Analytics Content Experiment is easy! Follow this four-step process and you’ll be on your way to running your first test. To start, first go to the ‘Experiments’ section of Google Analytics and click on ‘Create Experiment’.
Step 1: Setup the test
Advanced: if you are working with a high volume page and want to analyze more than one goal at a time, you can set up a ‘fake goal’ so that the test will not optimize towards a single winner.
Use a ‘fake goal’ to run the test longer than 2 weeks:
Multi-armed bandit: Content Experiments uses a traffic splitting method called Multi-armed bandit (MAB) which essentially weights the traffic towards the variation(s) that appear to be winning, away from losing variations. In theory, this could help you find an answer more quickly and/or prevent loss due to poor performing variants.
In practice, this method can be great for experimenters who are working on smaller websites where a bad performing variant will have significant impact or for experimenters who would like the testing platform to do most of the heavy lifting. I tend to turn this off for tests I run (by toggling ‘distribute traffic evenly across all variations’ to ‘on’) as I prefer to have more control over later analysis outside of the testing interface (where having even traffic splits is beneficial), but both ways are valid methods of running an experiment.
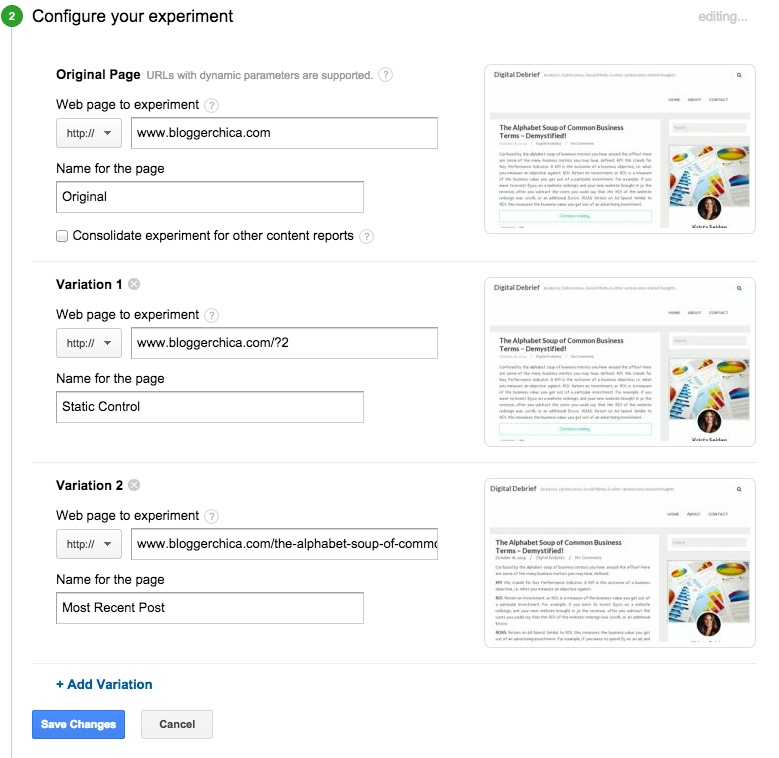
Step 2: Add your variations
Best Practice: Use a static control variation (an exact copy of the page you want to test with no changes, on it’s own unique URL). This cuts out any noise that may arise due to the redirect to a new page so you can compare apples to apples (static URL of the control vs static URL of the variant).
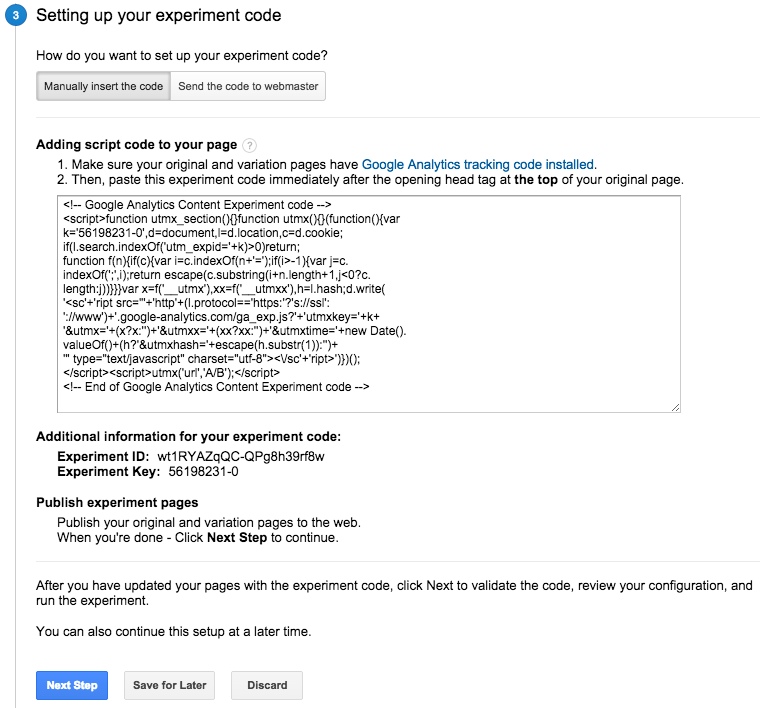
Step 3: Inserting the Content Experiment Code Snippet
You can choose to ‘Manually insert the code’, in which case you will be given a block of code that needs to be placed after the opening <head> tag on your original page, or you can choose ‘Send the code to webmaster’ which will email this block of code to the address you specify so that they can insert the code for you.
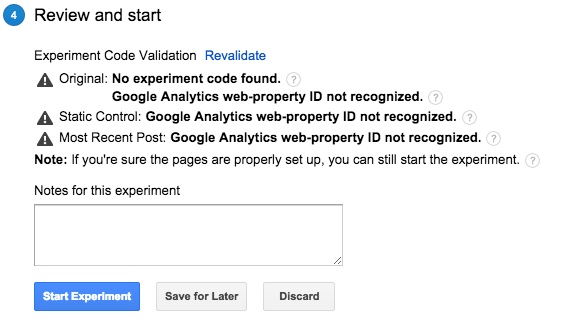
Step 4: Review and Validate Experiment
This will run a check on the setup to ensure that all of the steps have been done and the experiment will run properly. If it is not properly setup, you will see error messages such as these which will tell you where you should review before launching your experiment.
Once you’ve gone through all four setup steps, it’s time to start your experiment. Once started, you will see the experiment and current statistics listed in your experiment dashboard in the Experiments interface.
Step-by-Step: Setting up a Google Content Experiment on Your Website
Setting up a Google Analytics Content Experiment is easy! Follow this four-step process and you’ll be on your way to running your first test. To start, first go to the ‘Experiments’ section of Google Analytics and click on ‘Create Experiment’.
Step 1: Setup the test
Advanced: if you are working with a high volume page and want to analyze more than one goal at a time, you can set up a ‘fake goal’ so that the test will not optimize towards a single winner.
Use a ‘fake goal’ to run the test longer than 2 weeks:

Multi-armed bandit: Content Experiments uses a traffic splitting method called Multi-armed bandit (MAB) which essentially weights the traffic towards the variation(s) that appear to be winning, away from losing variations. In theory, this could help you find an answer more quickly and/or prevent loss due to poor performing variants.
In practice, this method can be great for experimenters who are working on smaller websites where a bad performing variant will have significant impact or for experimenters who would like the testing platform to do most of the heavy lifting. I tend to turn this off for tests I run (by toggling ‘distribute traffic evenly across all variations’ to ‘on’) as I prefer to have more control over later analysis outside of the testing interface (where having even traffic splits is beneficial), but both ways are valid methods of running an experiment.
Step 2: Add your variations
Best Practice: Use a static control variation (an exact copy of the page you want to test with no changes, on it’s own unique URL). This cuts out any noise that may arise due to the redirect to a new page so you can compare apples to apples (static URL of the control vs static URL of the variant).
Step 3: Inserting the Content Experiment Code Snippet
You can choose to ‘Manually insert the code’, in which case you will be given a block of code that needs to be placed after the opening <head> tag on your original page, or you can choose ‘Send the code to webmaster’ which will email this block of code to the address you specify so that they can insert the code for you.
Step 4: Review and Validate Experiment
This will run a check on the setup to ensure that all of the steps have been done and the experiment will run properly. If it is not properly setup, you will see error messages such as these which will tell you where you should review before launching your experiment.
Once you’ve gone through all four setup steps, it’s time to start your experiment. Once started, you will see the experiment and current statistics listed in your experiment dashboard in the Experiments interface.

Krista
You might also like
Using Site Search data in GA4
Step by Step: Setting up a GA4 Property in Google Analytics
Analyzing Reports in the new App + Web Property
Step by Step: Setting up a GA4 Event Tag in GTM
Next ArticleStep by Step: Setting Up a Quick Onsite Survey